Appearance
User Interface Guide
This guide walks you through Flint's interface, explaining each component and how to use it effectively.
Overview
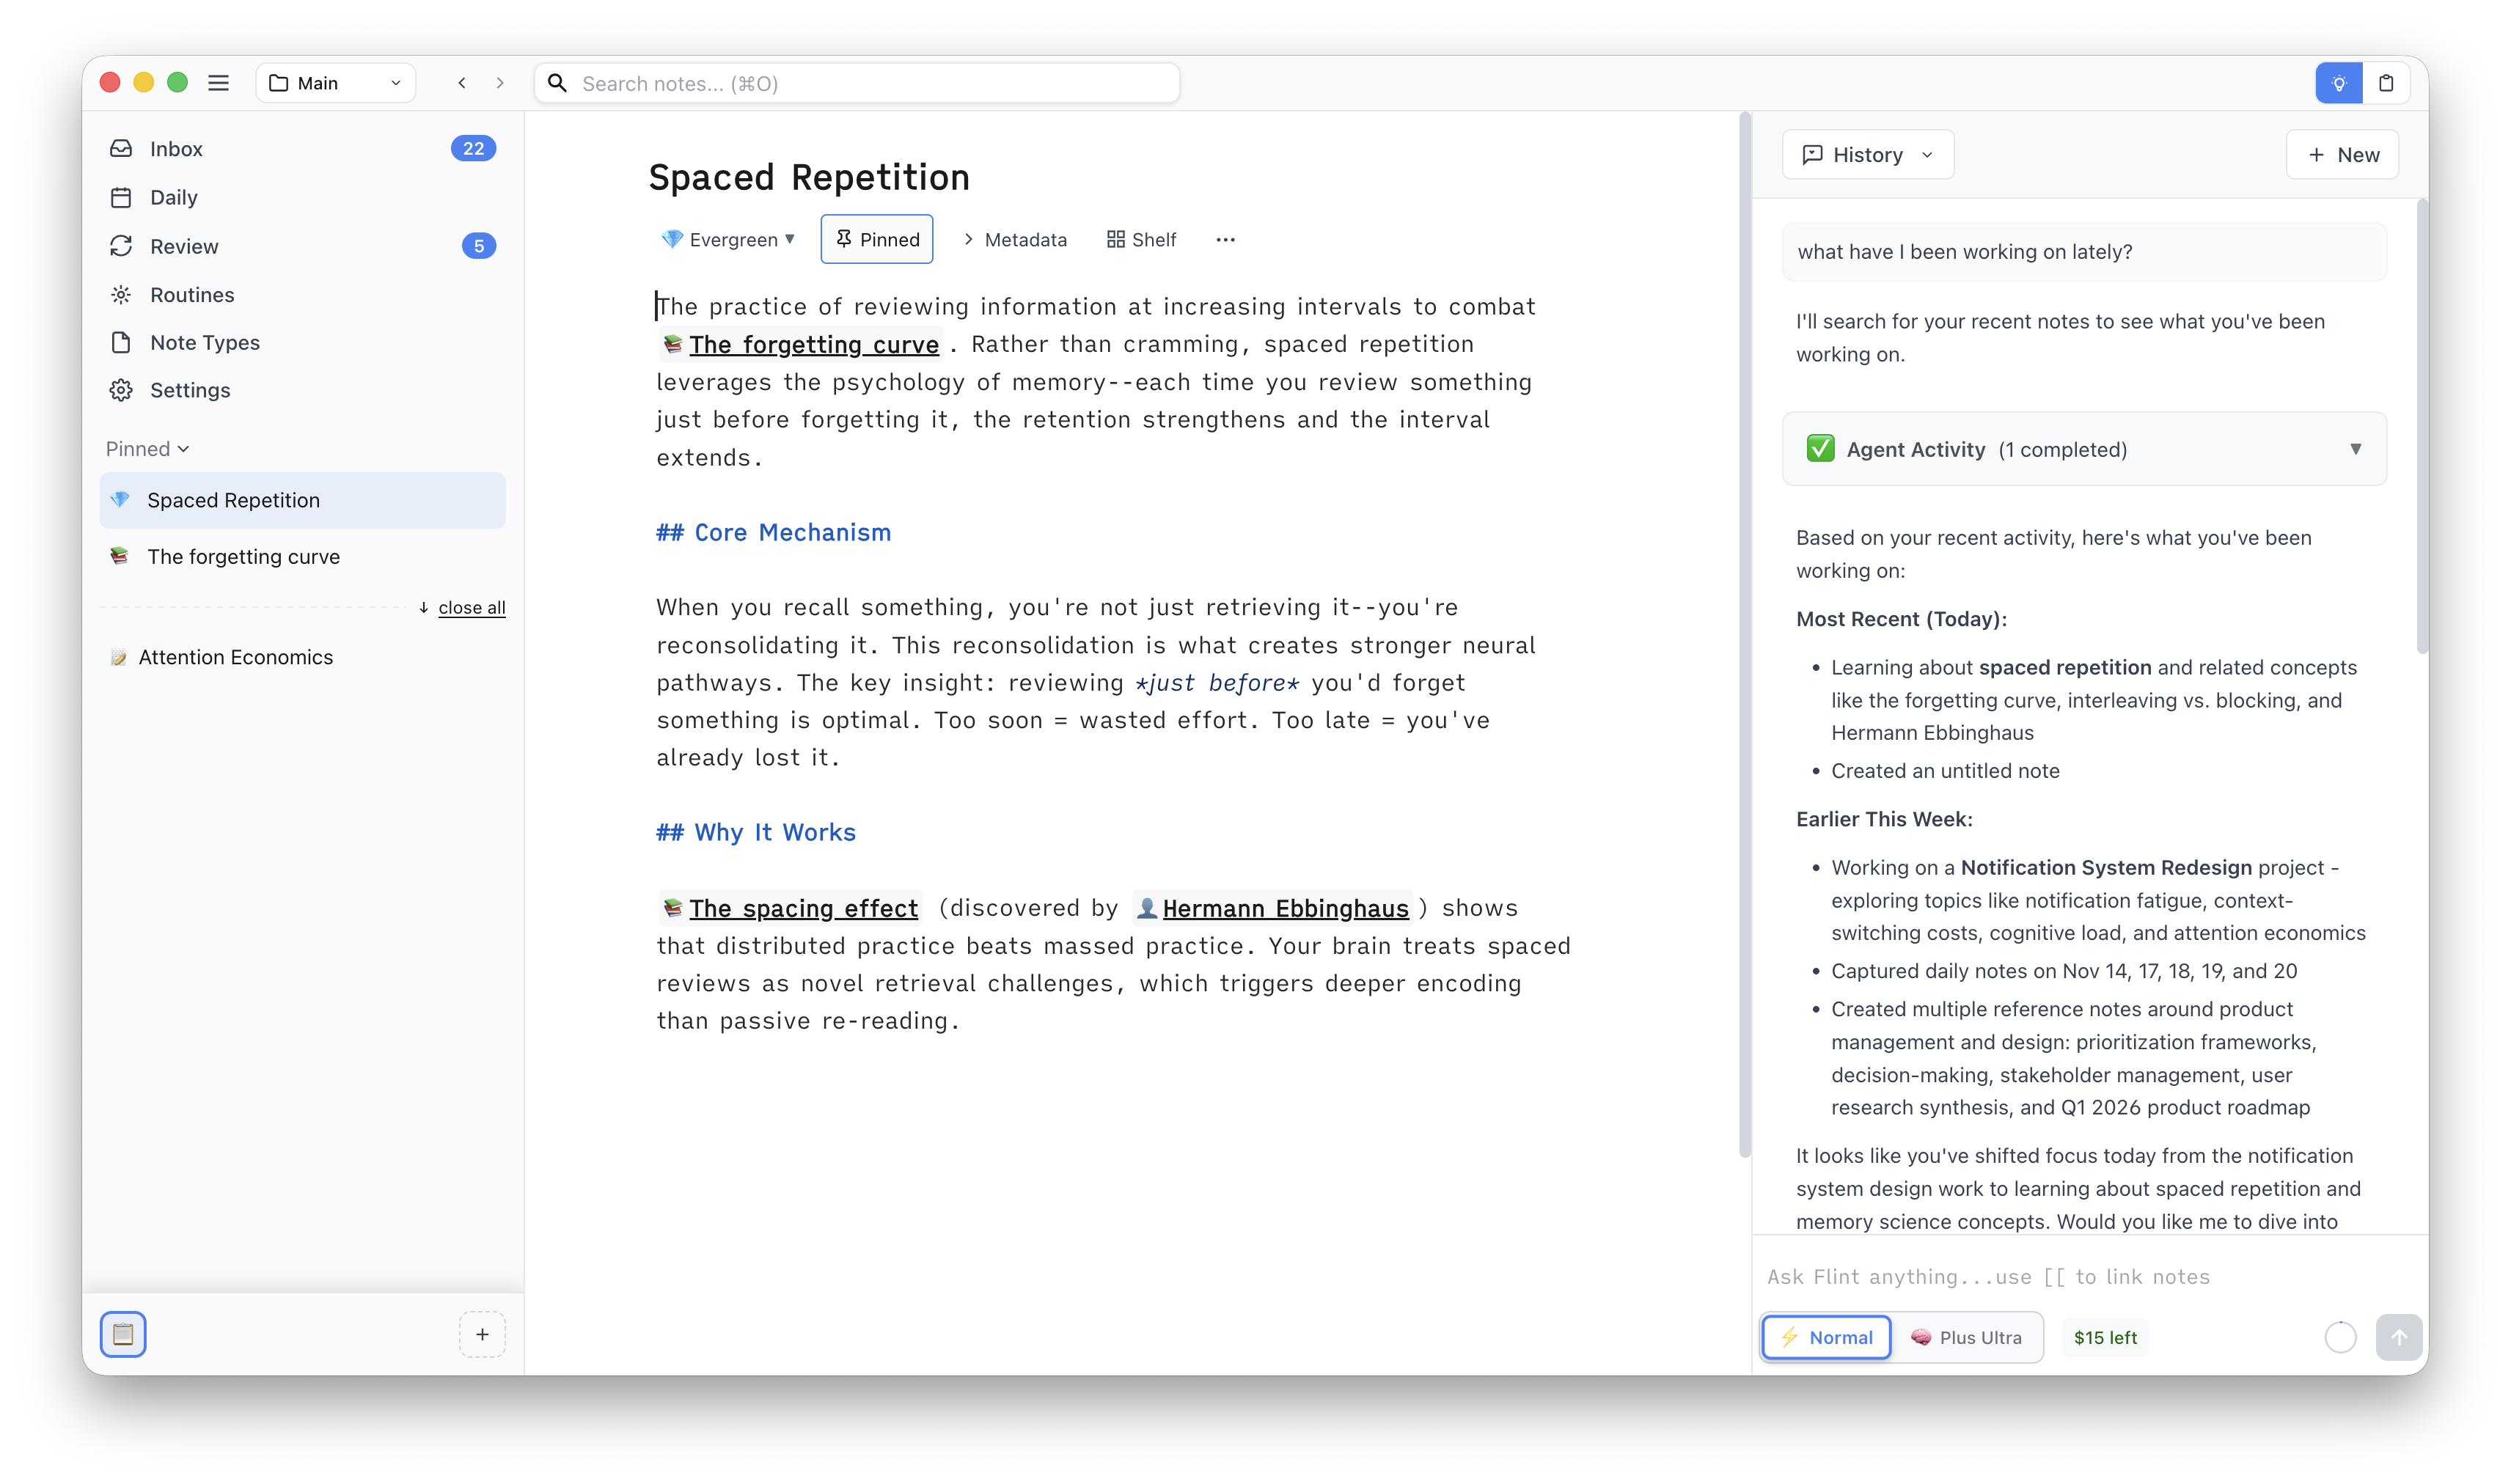
Key Areas
- Top Bar - Vault selector, navigation, search
- Left Sidebar - System views, pinned notes, workspaces
- Main View - Note editor where you write
- Right Sidebar - AI agent for assistance and insights
You can resize these sections by dragging the dividers between them.
Top Bar
The top bar provides global actions and navigation.
Components
Left side:
- Menu - Application menu
- Vault Selector - Switch between vaults (e.g., "Main")
- Navigation - Back/forward arrows
Center:
- Search (
⌘O/Ctrl+O) - Quick search across all notes
Right side:
- Agent/Shelf - Toggle between AI agent and shelf
Vault Selector
Click the vault name in the top-left to:
- See all your vaults
- Switch to a different vault
- Create a new vault
Left Sidebar: Navigation
The left sidebar provides quick access to your notes and system views.
System Views
At the top of the sidebar, you'll find quick access to:
- Inbox - Recently created notes notes (shows count badge)
- Daily - Weekly view of daily notes
- Review - Access spaced repetition review (shows count badge)
- Routines - Manage agent routines
- Note Types - Configure note types
- Settings - Application settings
Pinned Notes and Recent Notes
The left sidebar has two note sections below the system views:
Pinned Notes:
Notes you want permanent quick access to. These stay in the sidebar until you unpin them.
- Click the "Pinned" button in the note toolbar to pin a note
- Drag and drop to reorder pinned notes
- Visual indicators show note type (💎 for Evergreen, 📄 for regular notes, etc.)
Recent Notes:
Notes you've recently accessed. These appear below pinned notes.
- When you click a wikilink, the note opens in the Recent section
- Click "close all" to clear all recent notes
- Drag and drop to reorder recent notes
- To make a recent note permanent, click the "Pinned" button to move it to the Pinned section
Best practices:
- Pin notes you reference frequently: active projects, learning notes, reference materials
- Recent notes are temporary - let them accumulate as you navigate, then "close all" when done
- Limit pinned notes to 5-10 - Too many defeats the purpose of quick access
Workspaces Bar
At the bottom of the left sidebar, the workspaces bar lets you organize different contexts within your vault.
What are workspaces?
Workspaces are UI-level organization within your vault. Each workspace maintains its own:
- Pinned notes - Different pins for each workspace
- Recent notes - Separate recent notes
- Active note - Switching clears the active note
- Visual identity - Icon and name for quick recognition
Creating workspaces:
- Click the
+button in the workspace bar - Choose an icon (emoji picker)
- Enter a name
- Click "Create"
Switching workspaces:
- Click any workspace icon to switch
- Keyboard shortcuts:
Ctrl+1throughCtrl+9(Mac) orAlt+1throughAlt+9(Win) for first 9 workspaces
Managing workspaces:
- Edit: Right-click workspace icon → Edit (change name, icon)
- Reorder: Drag and drop workspace icons
- Delete: Right-click → Delete (requires at least one workspace to remain)
- Move notes: Right-click note → Move to Workspace
When to use workspaces vs. vaults:
- Use workspaces for different projects in same domain, context switching within one knowledge base
- Use separate vaults for completely separate contexts (work/personal), different security requirements
Best practices:
- Start with 2-3 workspaces, add as patterns emerge
- Keep 3-7 total workspaces for easy scanning
- Place most-used workspaces in positions 1-3 for keyboard shortcuts
- Use clear, descriptive names (e.g., "Mobile App" not "Project X")
Main View: Note Editor
The main view is where you create and edit notes.
Note Title and Toolbar
At the top of the editor:
- Note title - Large, prominent title (e.g., "Spaced Repetition")
- Note toolbar - Quick actions for the current note:
- Note type - Note type indicator (click to change)
- Pinned - Pin/unpin this note
- Metadata - Expand metadata editor (fields defined by note type)
- Shelf - Open note in the shelf (for quick reference)
- ... - More actions (Preview, Mark for review, Archive)
Editor Area
Features:
- Markdown syntax highlighting - Headers, bold, italic, code blocks
- Auto-save - Changes saved automatically
- Wikilink autocomplete - Type
[[to search for notes (shown in screenshot as[[The forgetting curve]]) - Wikilink navigation - Click links to follow them (e.g.,
[[Hermann Ebbinghaus]])
Right Sidebar: AI Agent
The right sidebar features Flint's AI agent for assistance and insights.
Agent Interface
The agent provides intelligent assistance as you work:
Conversation view:
- View selector dropdown (e.g., "History")
- New button to start fresh conversations
- Scrollable conversation history
- Your questions and the agent's responses
What can the agent do?
The agent can help you:
- Find and summarize recent work
- Answer questions about your notes
- Create connections between ideas
- Organize and structure information
- Track what you've been working on
See AI Agent for detailed capabilities.
Search
The top bar features a prominent search field for quick access to all your notes.
How to search:
- Click the search field or press
⌘O/Ctrl+O - Type to search across note titles and content
- Select a note to open it
Features:
- Instant search - Results appear as you type
- Fuzzy matching - Finds notes even with typos
- Title and content - Searches both
- Keyboard navigation - Arrow keys to select, Enter to open
Settings
Access application settings from the left sidebar's Settings option.
Available settings:
- Appearance - Theme, fonts, layout
- API Keys - Configure AI model access
- Database - Manage your note database
- Updates - Check for new versions
Customization
Resizing Panels
Drag the dividers between sections to resize:
- Left sidebar width
- Right sidebar width
Your preferred sizes are saved automatically.
Theme
Choose your theme in Settings:
- Light - Always light mode
- Dark - Always dark mode
- System - Follow OS preference (as shown in screenshot)
Navigation Workflow
A typical workflow using pinned and recent notes:
- Pin your core notes - Daily note, active projects, key references
- Navigate freely - Click wikilinks to explore, notes appear in Recent
- Work across notes - Recent notes stay accessible as you navigate
- Promote important notes - Click "Pinned" on a recent note to keep it permanently
- Clean up - Click "close all" when you're done exploring to clear recent notes
This keeps your sidebar organized: permanent notes at the top, temporary navigation below.
Next Steps
Now that you understand the interface:
- AI Agent - Learn what the AI agent can do
- Note Types - Understand different note types (Evergreen, Daily, etc.)
Remember: Flint's interface is designed to stay out of your way. Focus on capturing and connecting ideas—the tools are there when you need them.